Building Lightning-Fast Dashboards: Connect Arc with Apache Superset
Hey there! Welcome to our first hands-on tutorial for Arc. Today, I'm going to walk you through connecting Arc with Apache Superset and show you how to visualize your time-series data like a pro.
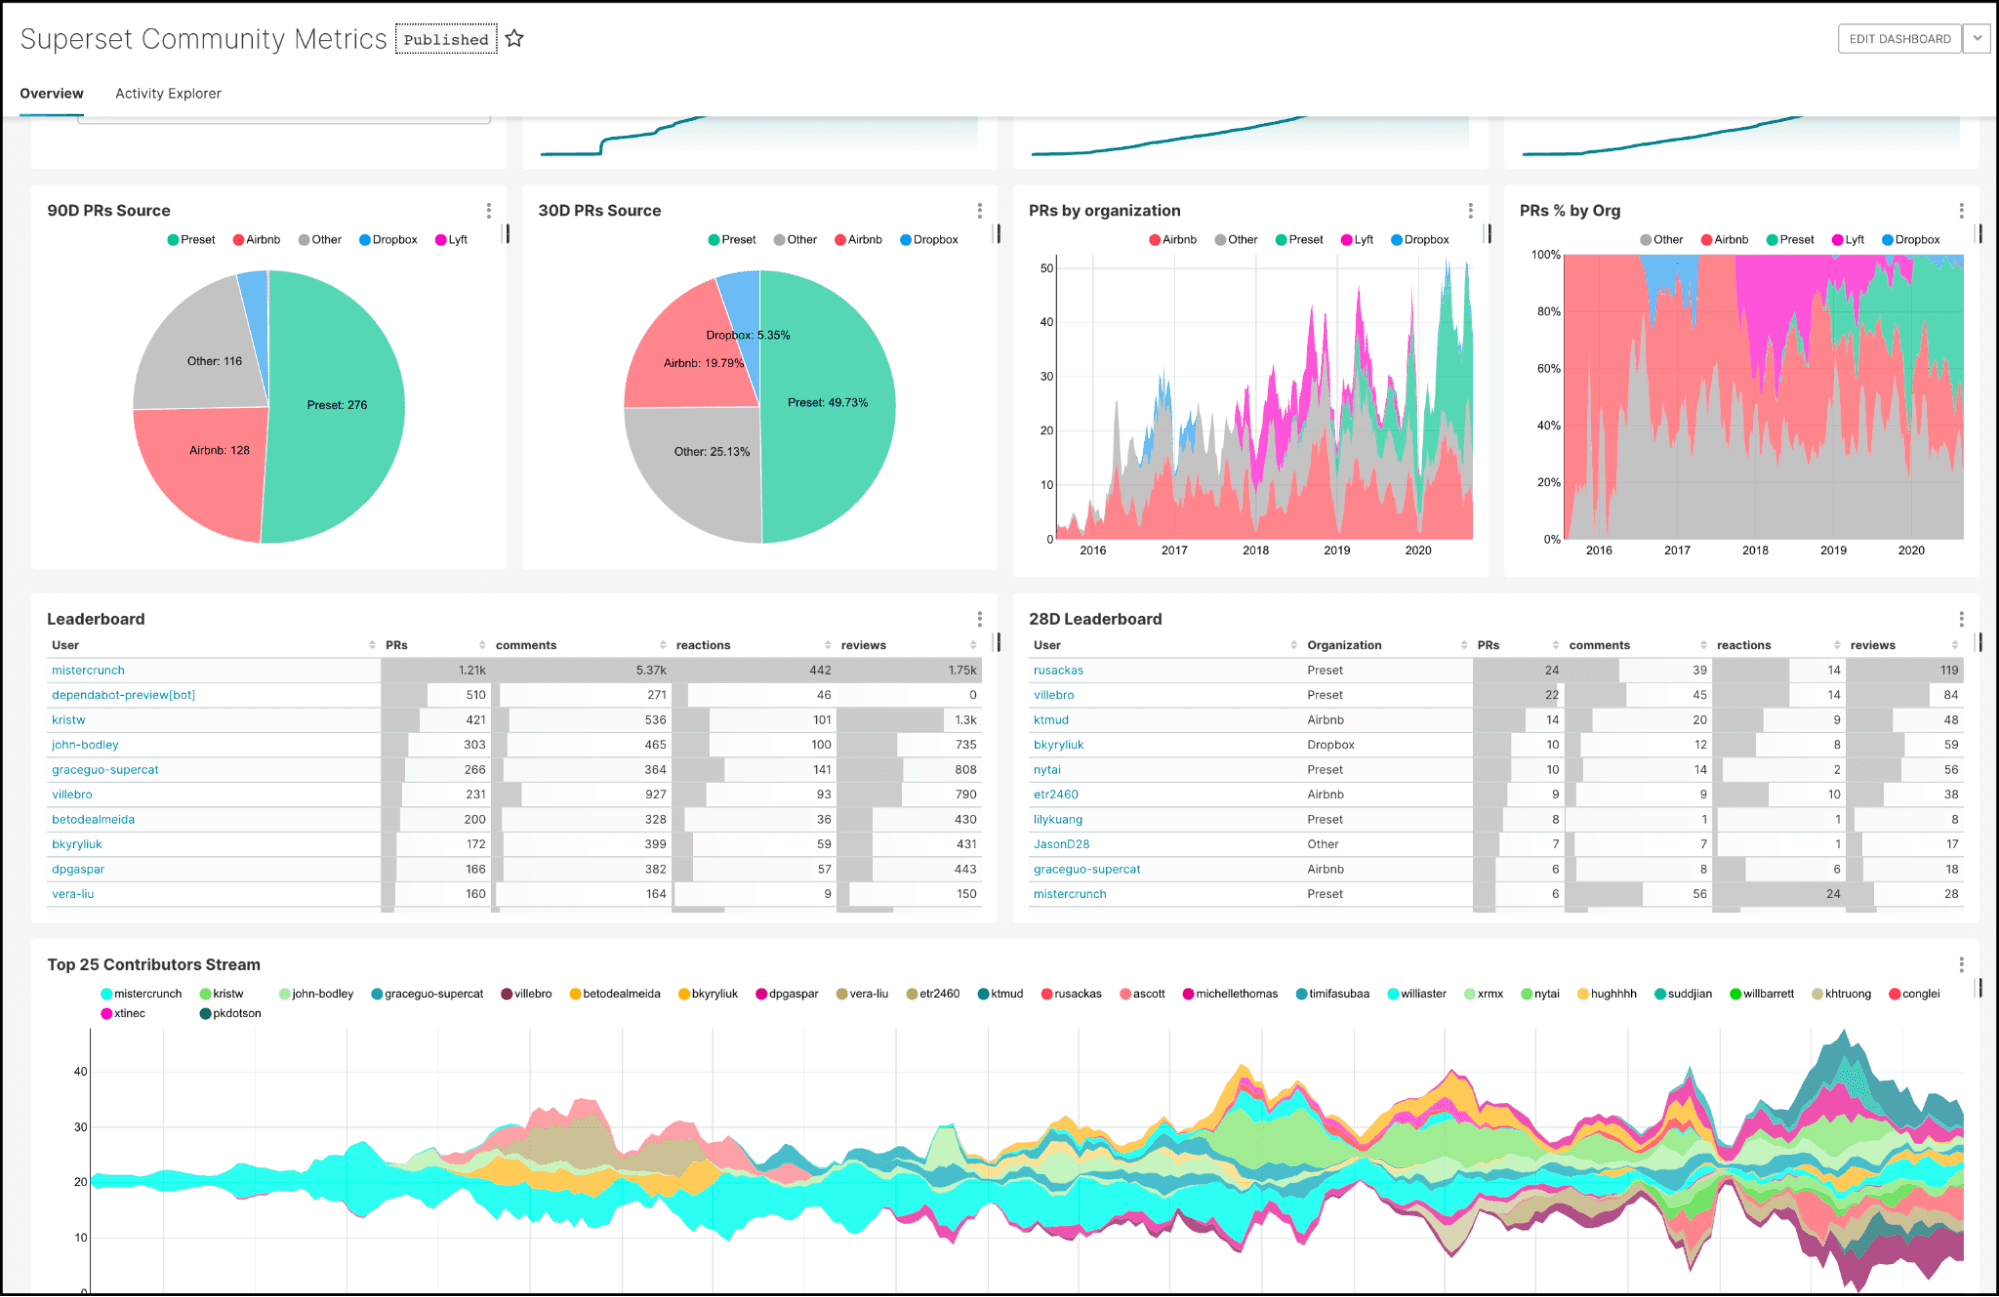
If you haven't heard of Apache Superset yet, it's basically a super powerful open-source data visualization platform. Think of it as your Swiss Army knife for creating dashboards and exploring data. And the best part? Superset plays really well with Arc through not one, but two different connection methods.
We've got two Arc dialects for Superset:
- arc-superset-dialect: Uses JSON for data transfer. Perfect for getting started and works great for smaller datasets.
- arc-superset-arrow: Uses Apache Arrow IPC format. This one's the speed demon, we're talking 28-75% faster queries depending on your dataset size. If you're moving large amounts of data, this is your go-to.
Both options give you full SQL support, API key authentication, and automatic discovery of all your Arc databases and tables. Pretty neat, right?
Want to learn more about Superset? Check out https://superset.apache.org/
Getting Started with Docker
Alright, let's get our hands dirty. The easiest way to get Arc running is with Docker. We'll get Arc up and running first, then set up Superset separately with the Arc dialect.
Setting up Arc
Arc comes with a Docker Compose setup. First, clone the Arc repository:
git clone https://github.com/Basekick-Labs/arc.git
cd arc
The Arc docker-compose.yml already has everything configured, but we need to expose the API port. Modify the arc-api service in docker-compose.yml to add the ports section:
services:
  arc:
    build: .
    container_name: arc
    restart: unless-stopped
    environment:
      STORAGE_BACKEND: local
      LOCAL_STORAGE_PATH: /data/arc/
      DB_PATH: /data/arc.db
      ARC_QUERY_CACHE_TTL: 60
      ARC_LOG_LEVEL: INFO
      ARC_DISABLE_WAL: "true"
    ports:
      - "8000:8000"  # Add this line to expose Arc API
    volumes:
      - arc-db:/data
      - arc-data:/data/arc
      - arc-logs:/app/logs
    healthcheck:
      test: ["CMD", "curl", "-f", "http://localhost:8000/health"]
      interval: 30s
      timeout: 10s
      retries: 3

volumes:
  arc-db:
  arc-data:
  arc-logs:
Fire it up:
docker-compose up -dThis will build Arc from source. The first build might take a few minutes, so perfect time for that coffee break!
Check if it's running:
docker-compose psYou should see the arc container up and healthy.
Getting Your Arc API Token
Arc uses token-based authentication to keep your data secure. The good news? Arc automatically creates a token for you on first startup. The bad news? You'll only see it one time, so get it from the first run.
Check the Arc logs to grab your token:
docker logs arc | grep "Initial admin API token"You should see something like:
======================================================================
FIRST RUN - INITIAL ADMIN TOKEN GENERATED
======================================================================
Initial admin API token: mytokenisthebest
======================================================================
SAVE THIS TOKEN! It will not be shown again.
Use this token to login to the web UI or API.
You can create additional tokens after logging in.
======================================================================
Save that token! You'll need it for connecting Superset to Arc. Pro tip: export it to your environment for convenience:
export ARC_TOKEN="arc_1234567890abcdef"Want to see what's happening under the hood? Check the live logs:
docker-compose logs -f arc-apiPushing Data to Arc
Before we can visualize anything in Superset, we need some data in Arc. Let me show you a quick example of how to push time-series data to Arc.
Arc has a simple HTTP API for ingesting data. Here's a Python example that pushes some sample metrics:
import msgpack
import requests
from datetime import datetime
import os

# Get API token
token = os.getenv("ARC_TOKEN")

# All data organized as columns (arrays), not rows
data = {
    "m": "cpu",                    # measurement name
    "columns": {                   # columnar data structure
        "time": [
            int(datetime.now().timestamp() * 1000),
            int(datetime.now().timestamp() * 1000) + 1000,
            int(datetime.now().timestamp() * 1000) + 2000
        ],
        "host": ["server01", "server02", "server03"],
        "region": ["us-east", "us-west", "eu-central"],
        "datacenter": ["aws", "gcp", "azure"],
        "usage_idle": [95.0, 85.0, 92.0],
        "usage_user": [3.2, 10.5, 5.8],
        "usage_system": [1.8, 4.5, 2.2]
    }
}

# Send columnar data (2.32M RPS throughput)
response = requests.post(
    "http://localhost:8000/write/v2/msgpack",
    headers={
        "Authorization": f"Bearer {token}",
        "Content-Type": "application/msgpack",
        "x-arc-database": "system"  # Optional: specify database
    },
    data=msgpack.packb(data)
)

# Check response (returns 204 No Content on success)
if response.status_code == 204:
    print(f"Successfully wrote {len(data['columns']['time'])} records!")
else:
    print(f"Error {response.status_code}: {response.text}")
You can save this in a file, let's say, data.py, save it, and then execute it. (Make sure to execute this several times so we can have some data to graph later)
python3 data.pyThe output should be something like this
Successfully wrote 3 records!
Arc will automatically create the database and table if they don't exist. Pretty convenient!
Setting up Superset with Arc Dialect
Now that Arc is running, let's get Superset set up with the Arc dialect. You have two main options here: install the dialect into an existing Superset instance, or build a custom Superset Docker image that includes the Arc dialect.
Option 1: Installing into Existing Superset (Easiest)
If you already have Superset running (or want to set it up from scratch), you can simply install the Arc dialect via pip. You have two dialect choices:
JSON Dialect (Good for Getting Started)
This is the straightforward option that works great for most use cases:
pip install arc-superset-dialectThen restart Superset:
superset run -h 0.0.0.0 -p 8088Arrow Dialect (High Performance)
Want those 28-75% speed gains? Install the Arrow-based dialect instead:
pip install arc-superset-arrowThen restart Superset:
superset run -h 0.0.0.0 -p 8088Pro tip: You can actually have both installed and create separate connections to Arc using each dialect. This lets you test performance differences side-by-side!
Option 2: Building Superset Docker Image with Arc
If you prefer a containerized setup, you can build a custom Superset Docker image with the Arc dialect baked in. Both GitHub repos include Dockerfiles that handle everything for you.
For JSON dialect:
git clone https://github.com/basekick-labs/arc-superset-dialect.git
cd arc-superset-dialect
docker build -t superset-arc:latest .
docker run -d -p 8088:8088 -v superset_home:/app/superset_home \
  --name superset-arc superset-arc:latest
For Arrow dialect:
git clone https://github.com/basekick-labs/arc-superset-arrow.git
cd arc-superset-arrow
docker build -t superset-arc:latest .
docker run -d -p 8088:8088 -v superset_home:/app/superset_home \
  --name superset-arc superset-arc:latest
Both images come with Superset pre-configured, the Arc dialect installed, automatic database initialization, and default admin credentials (admin/admin – definitely change those in production!).
Connecting Superset to Arc
Now for the fun part – let's connect Superset to Arc so we can start building dashboards.
Accessing Superset
Open your browser and head to http://localhost:8088. The default credentials are:
- Username: admin
- Password: admin
(Change these in production, obviously!)
Adding Arc as a Data Source
Once you're logged in:
-
Click on "Settings" menu in the top right and select "Database Connections" and then click on + Database
-
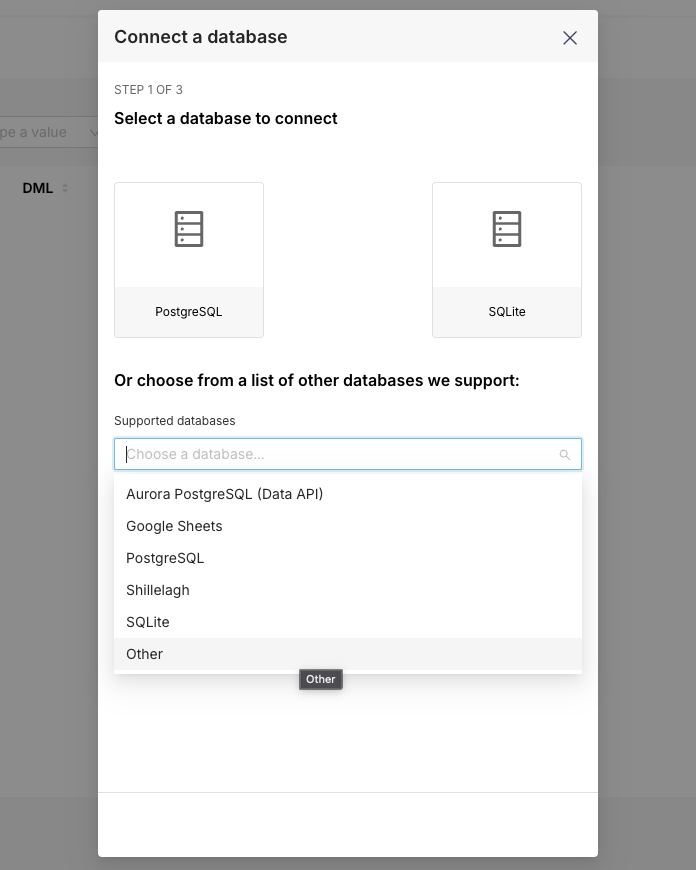
In the Supported Databases dropdown menu, select Other like the image that you can see here:
-
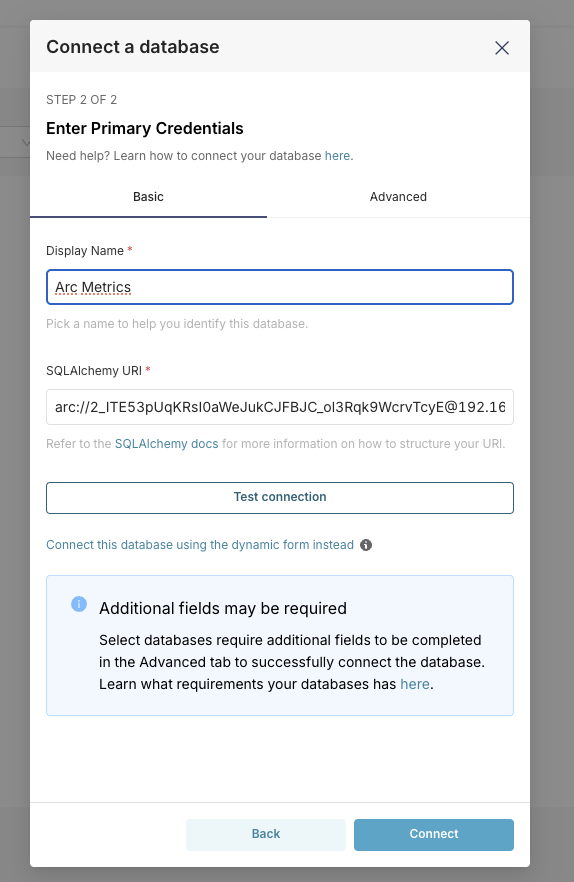
Enter your connection string:
arc://arc_1234567890abcdef@arc:8000/systemBreaking this down:
arc://- the protocolarc_1234567890abcdef- your API keyarc:8000- hostname and port (we usearcbecause that's the Docker service name, port 8000)system- the database name
-
Test the connection by clicking the "Test Connection" button. If everything's configured correctly, you should see a success message!
-
Click "Connect" and give your database a friendly name like "Arc Metrics"
Exploring Your Arc Data
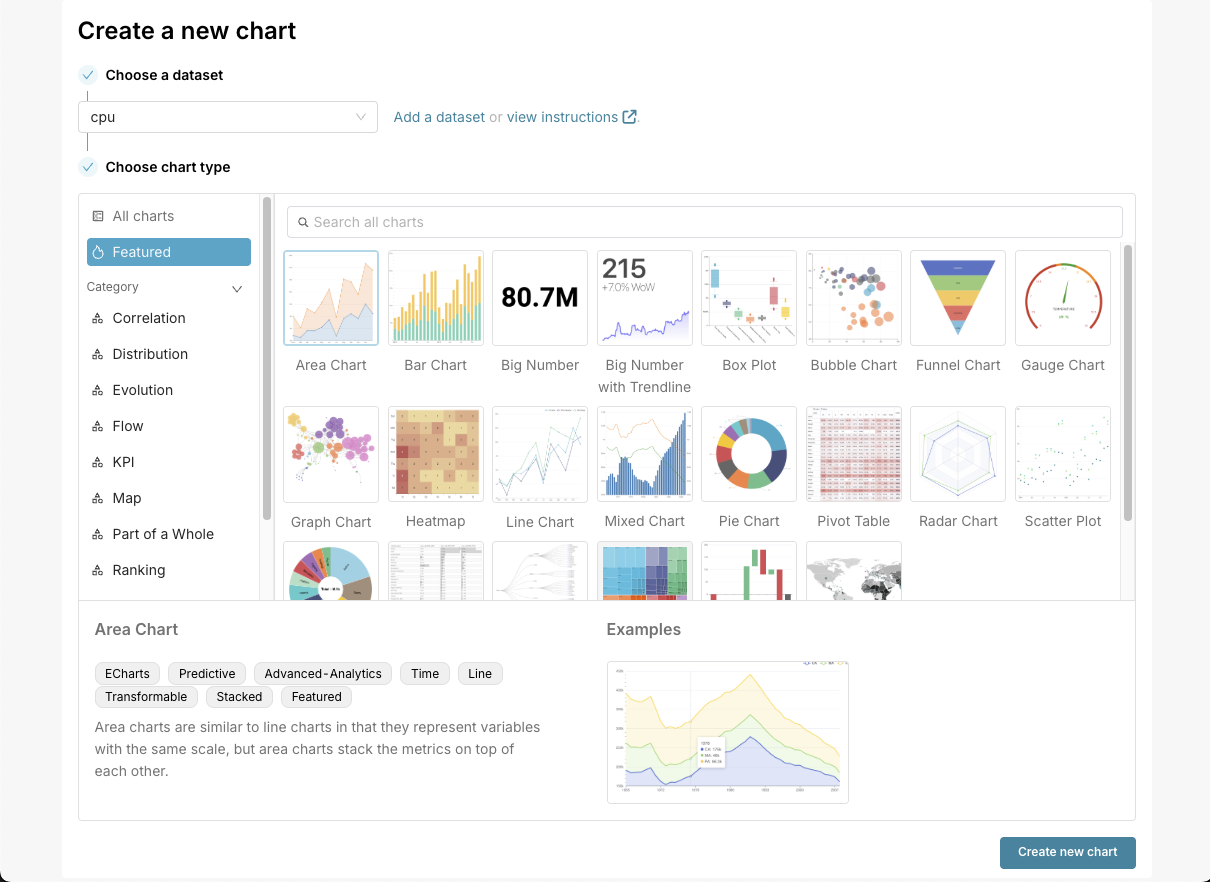
After connecting, Superset will automatically discover all your tables in Arc. Head over to "Datasets" then in + Dataset, select the Database Arc Metrics, the schema system, and then the table cpu. The result should be something like this:
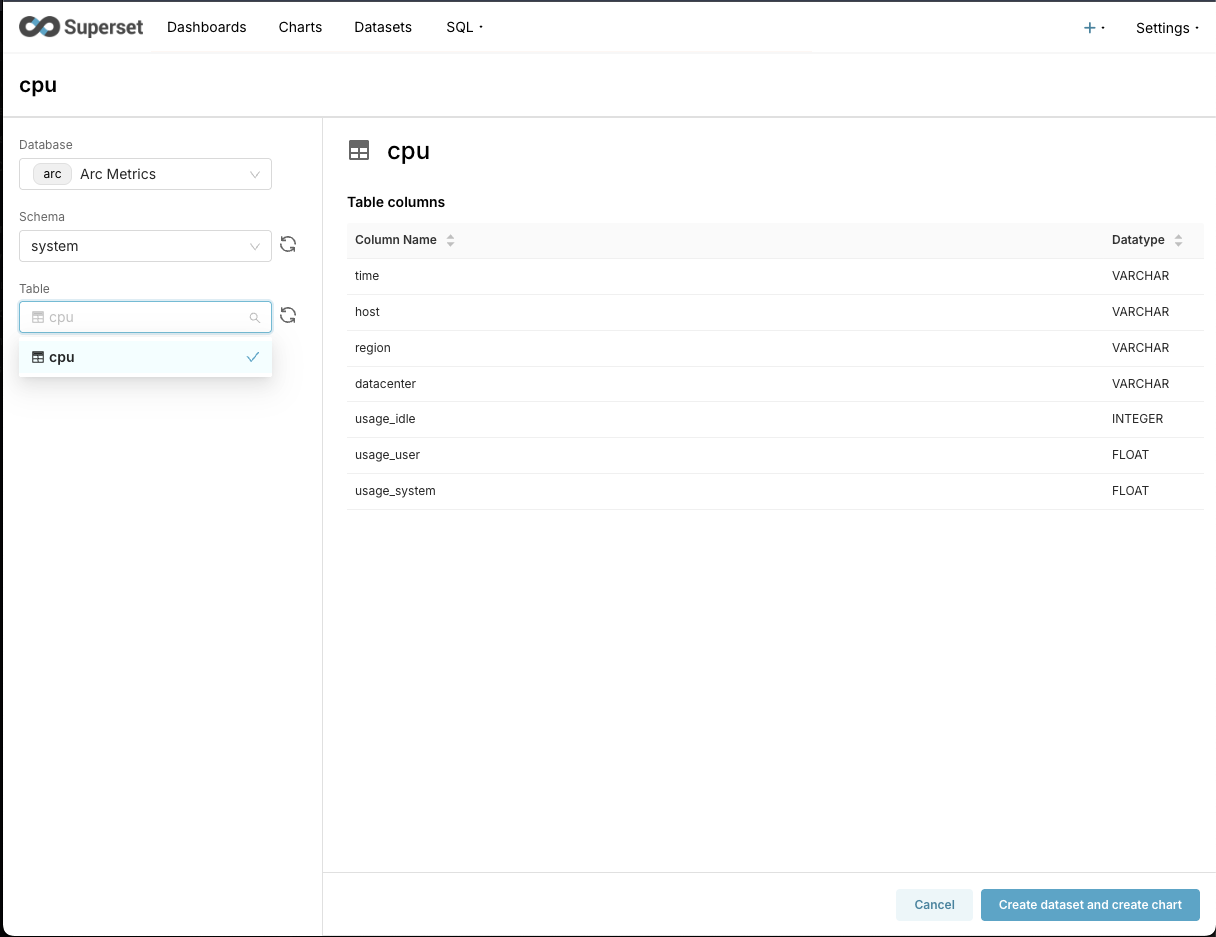
Click on Create dataset and create chart and let's create a panel to visualize the data we just ingested.
Once we are there, we should select time in X-axis, and in Metrics one of the metrics; in our case, let's use usage_system. If we want, we can add a filter to filter for the server that you want. In this case, I filtered the data for server02.
In my case, the chart looks simple, but it's a good signal that it works.
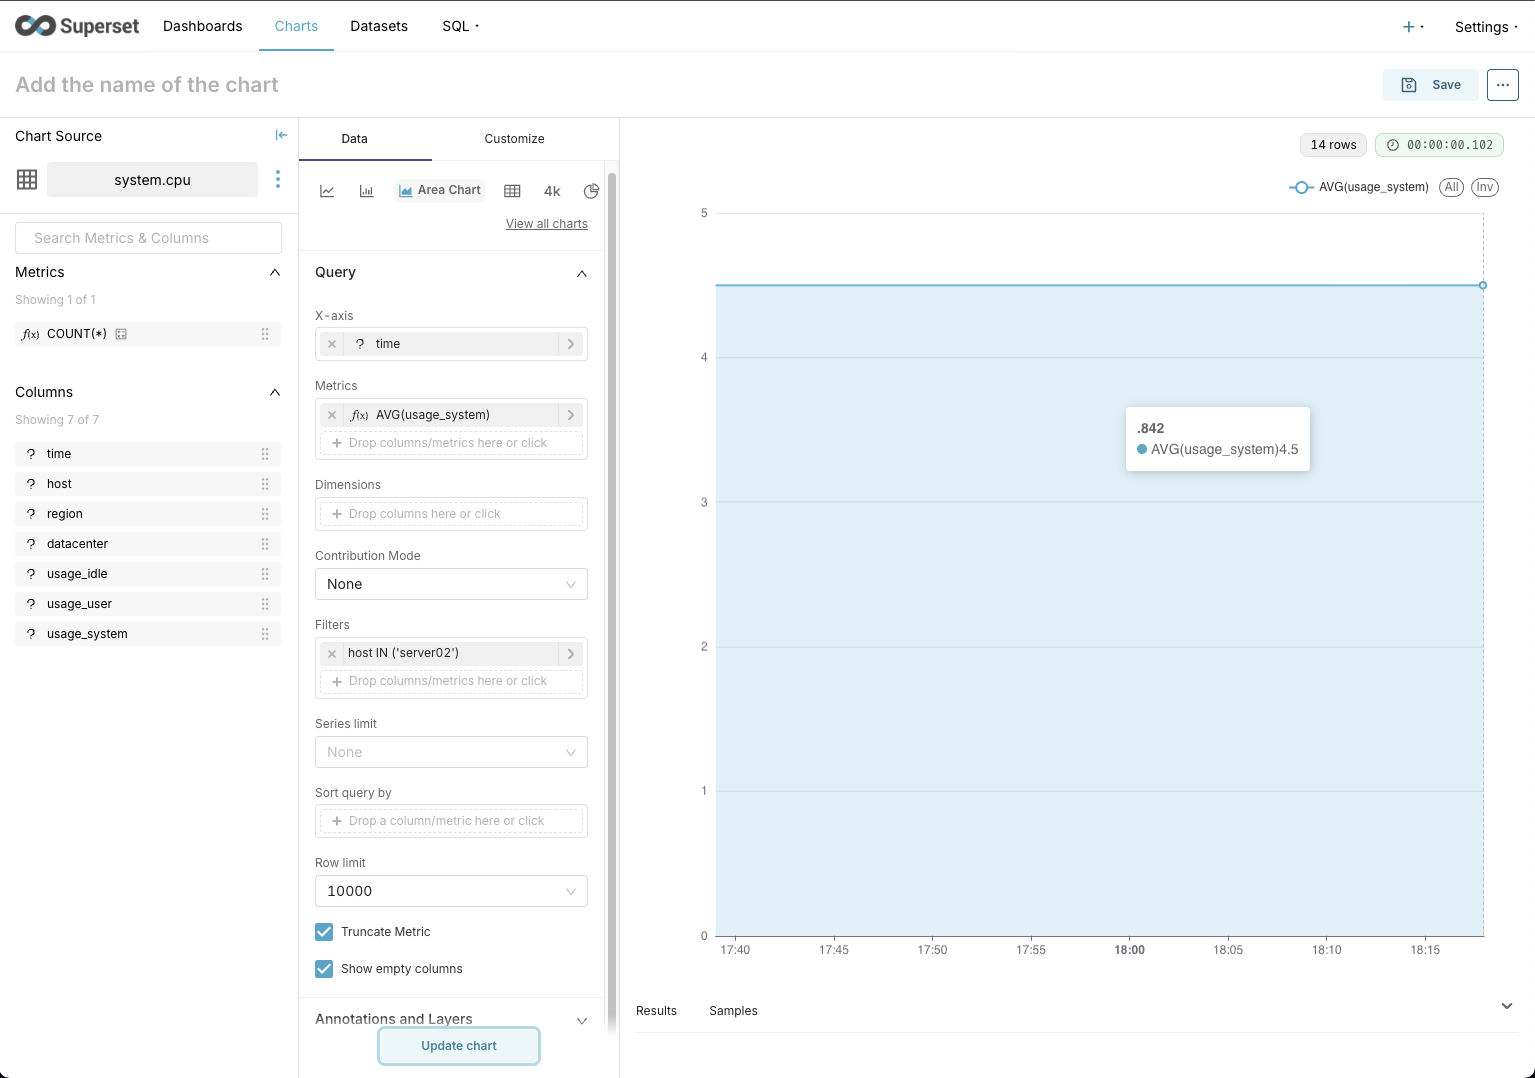
We can save this chart to use it in a dashboard by clicking the Save button at the top right.
Running Queries in Superset
Now that we've seen how to create a chart to use in a dashboard, let's run some queries against our Arc data! Head to SQL from the top menu, select SQL Lab and let's do it.
Basic Query Example
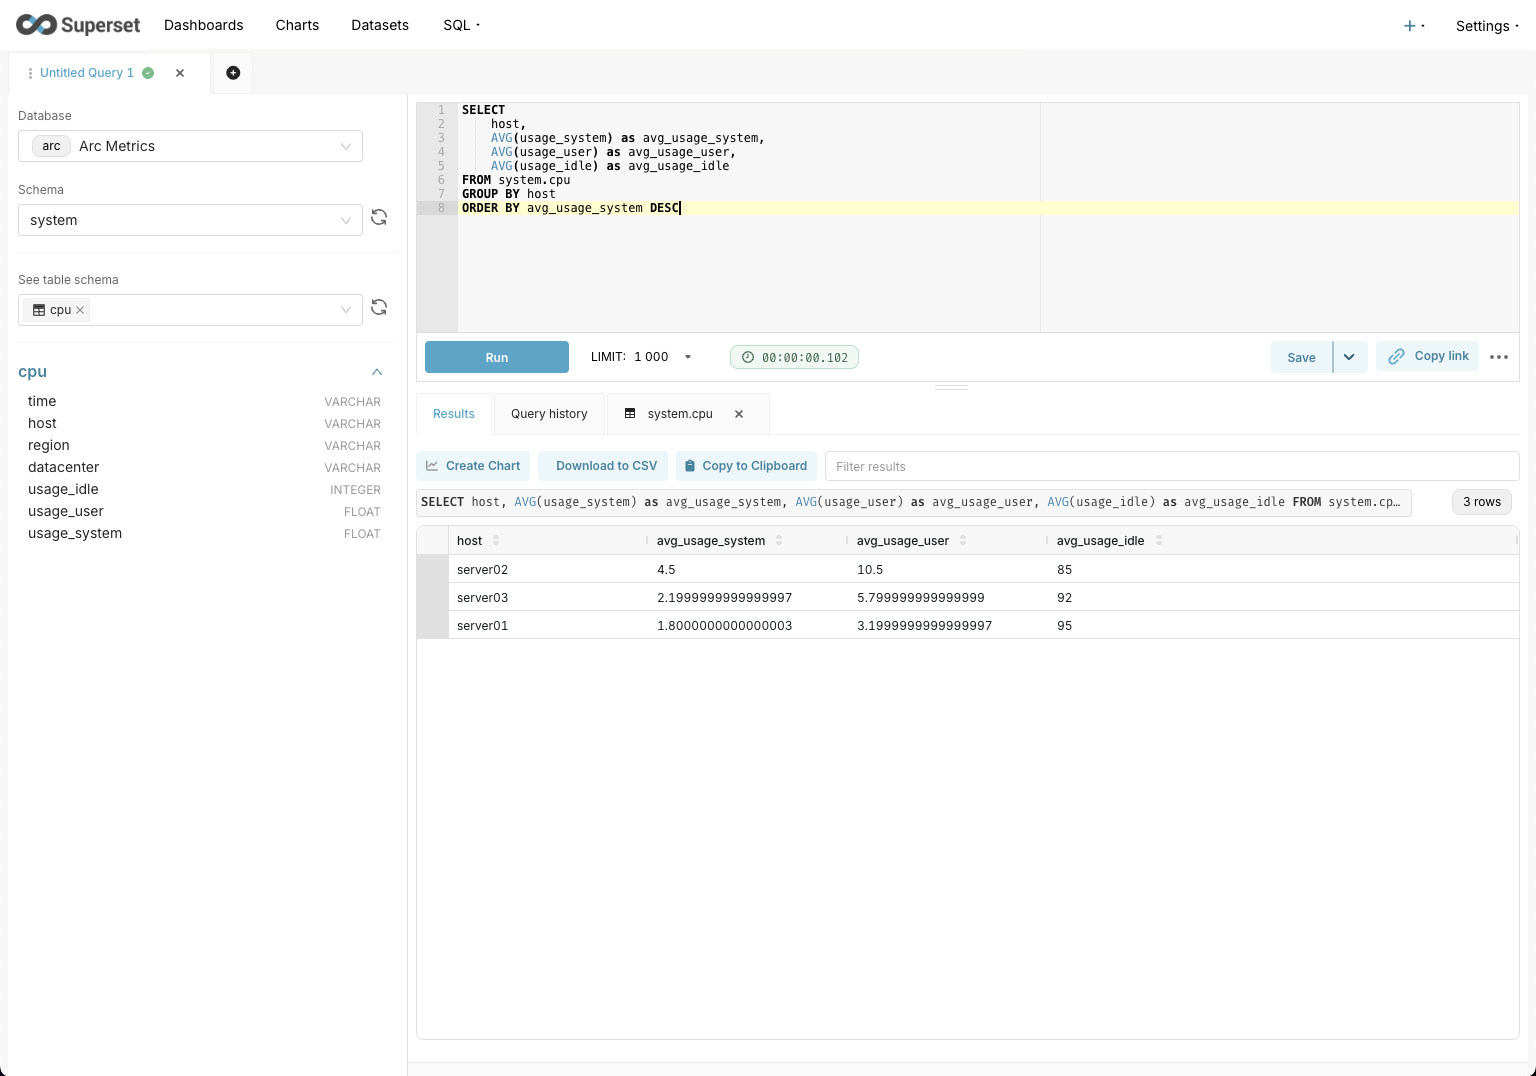
Here's a simple query to get the average CPU usage per server:
SELECT
    host,
    AVG(usage_system) as avg_usage_system,
    AVG(usage_user) as avg_usage_user,
    AVG(usage_idle) as avg_usage_idle
FROM system.cpu
GROUP BY host
ORDER BY avg_usage_system DESC
Arc's DuckDB-powered SQL engine handles this instantly. You'll see results appear in the query editor.
Time-Series Query with Arc
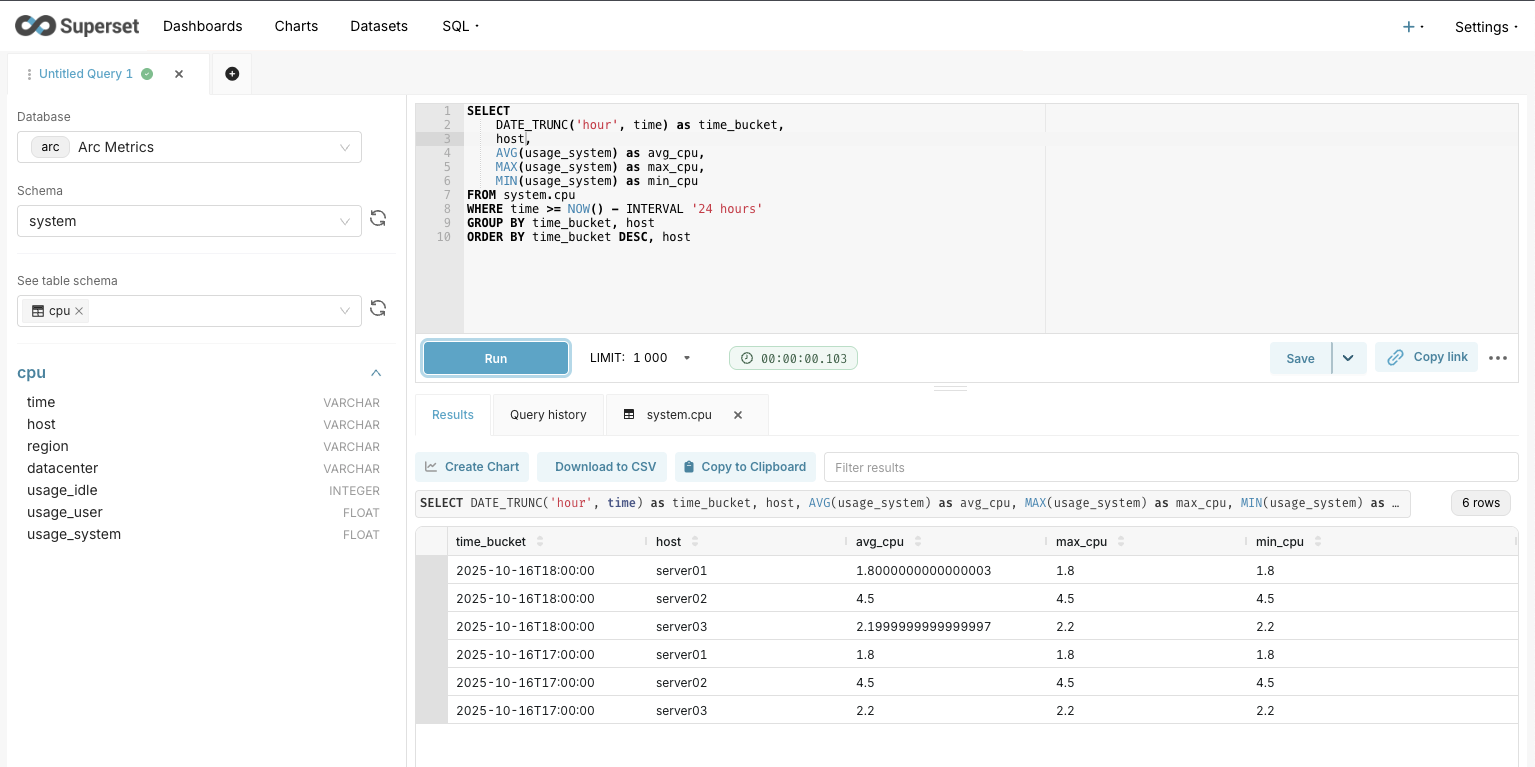
Since Arc is built for time-series data, let's do something more interesting with time bucketing:
SELECT
    DATE_TRUNC('hour', timestamp) as time_bucket,
    server,
    AVG(cpu_usage) as avg_cpu,
    MAX(cpu_usage) as max_cpu,
    MIN(cpu_usage) as min_cpu
FROM server_stats
WHERE timestamp >= NOW() - INTERVAL '24 hours'
GROUP BY time_bucket, server
ORDER BY time_bucket DESC, server
This groups data by hour and gives us nice aggregations. Arc handles time-series queries like this effortlessly.
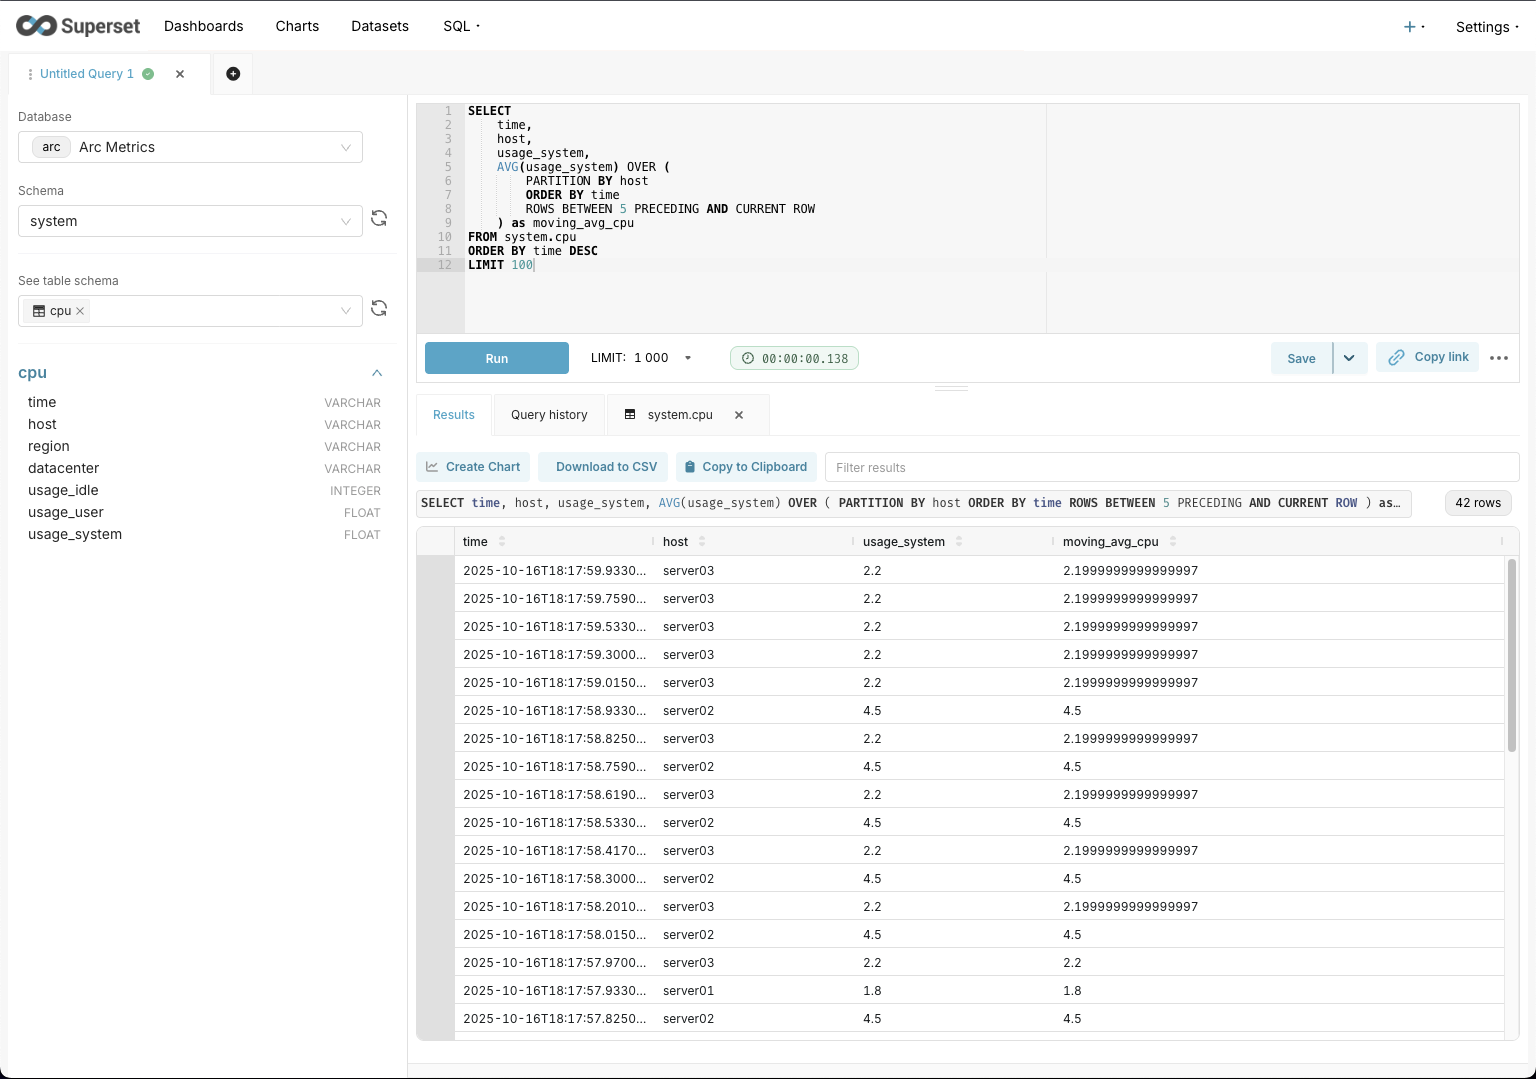
Advanced Query: Moving Averages
Want to calculate a moving average? Arc supports window functions:
SELECT
    time,
    host,
    usage_system,
    AVG(usage_system) OVER (
        PARTITION BY host
        ORDER BY time
        ROWS BETWEEN 5 PRECEDING AND CURRENT ROW
    ) as moving_avg_cpu
FROM system.cpu
ORDER BY time DESC
LIMIT 100
The beauty of using Arc with Superset is that all these queries execute quickly thanks to Arc's columnar storage. And if you're using the Arrow dialect, you'll notice even better performance on large result sets.
Performance: JSON vs Arrow
Quick note on choosing between the two Arc dialects for Superset:
Use arc-superset-dialect (JSON) when:
- You're just getting started
- Your result sets are relatively small (< 10k rows)
- You want the simplest setup
Use arc-superset-arrow (Arrow) when:
- You're working with large datasets
- Query performance is critical
- You need 28-75% faster query execution
- You're building dashboards with real-time data
Both dialects support the exact same SQL features and Arc functionality. The only difference is how data gets transferred from Arc to Superset. Arrow uses a columnar, zero-copy format that's way more efficient for large result sets.
Wrapping Up
And that's it! You now have Arc connected to Apache Superset and can start building awesome dashboards for your time-series data.
The combination of Arc's lightning-fast columnar storage and Superset's flexible visualization capabilities is pretty powerful. Whether you choose the JSON dialect for simplicity or the Arrow dialect for maximum performance, you're getting a solid stack for time-series analytics.
Both Arc and Superset are under active development, so expect even more features and better integration in the future. If you run into any issues or have questions, feel free to open an issue on the GitHub repos:
Happy dashboarding!
Build your next observability platform with Arc
Deploy in minutes with Docker or native mode. Ingest millions of metrics per second, query millions of rows in seconds, and scale from edge to cloud.